本文写作于2025.3.20,恰好作者正好在外面实习,于此同时在实际工作中遇到这些知识点,因此就进行一个简短汇总方便后续回顾,可以直接看第三节
1、简短理解一下什么是多进程/多线程/装饰器和一些基本概念
多进程:指在同一个程序中同时运行多个独立的进程。每个进程都有自己的内存空间和资源,互不干扰。常用在CPU密集型任务中。
比如说:比如你打开了多个浏览器窗口,每个窗口就是一个独立的进程,互不影响。即使一个窗口崩溃,其他窗口也不会受到影响。
多线程:指在同一个进程内同时运行多个线程,多个线程共享同一块内存空间。适合I/O密集型任务(主要涉及到输入输出操作的任务。这些任务的执行时间主要花费在等待IO操作的完成上),线程之间的切换比进程更轻便。
比如说:你在看视频的同时,后台也在下载文件。这些操作都是通过不同的线程完成的,视频播放和下载互不干扰。
装饰器:一种特殊的函数,能在不修改原函数代码的情况下,给函数添加额外的功能。
比如说:在一个函数前后自动记录执行时间或日志,常用 @decorator_name 语法
全局解释器锁(GIL):它使得任何时刻仅有一个线程在执行。即便在多核心处理器上,使用 GIL 的解释器也只允许同一时间执行一个线程。常见的使用 GIL 的解释器有CPython与Ruby MRI。
2、在实际任务中使用多进程/多线程
假设有一个任务是将8000000个数字1相加,我们提前假设我们已经构建好了这样一个数组,并且我们需要记录一下代码运行需要的时间,普通处理思路:
start_time = time.time()
sum_num = 0
for i in num_list:
    sum_num += i
print(f"Used Time:{time.time()- start_time}")
需要时间:Used Time:0.9650969505310059,那么有一个思路我先去把num_list拆分为8份(因为数字相加并不会冲突,用分块知识解决)然后计算时间 Used Time:0.07107281684875488,但是这样数据计算是串行的(执行完第一块,然后去计算第二块),那么我们可以考虑多线程直接8块一起计算然后将最后结果汇总起来,这样得到的时间为:Used Time:0.09244751930236816,于此同时使用多进程计算得到结果:Used Time:0.854262113571167。这样就会又一个有意思现象,理论上来说多进程,多线程速度应该是都大于常规的分割法,出现这个原因是因为:
-
GIL(全局解释器锁)影响
Python 的ThreadPoolExecutor受 GIL 限制,多个线程并不会真正并行执行,而是交替运行,因此它比单线程快,但 提升有限。
由于sum计算是 CPU 密集型任务,线程池无法充分发挥 CPU 多核优势,导致性能 不如串行分块计算。 -
进程间通信(IPC)开销
ProcessPoolExecutor会 为每个进程创建独立的 Python 解释器,数据需要 在主进程和子进程之间传输,但num_list非常大,导致 数据传输和进程调度成本过高,反而影响性能。 -
任务拆分的额外开销
由于sum操作本身非常简单,计算时间短,线程池和进程池的 管理开销(线程/进程创建、调度、回收)可能超过计算本身的成本,导致整体运行时间反而变长。用人话来说就是,使用多进程,就需要考虑到通信的花销,用多线程就要考虑到 GIL限制,换言之得到的结论就是:
多线程(ThreadPoolExecutor) 适用于 I/O 密集型任务(如文件读写、网络请求),但 CPU 计算任务受 GIL 限制,提升有限。
多进程(ProcessPoolExecutor) 适用于 CPU 密集型任务,但数据传输开销大,对 短时间计算任务 可能不适用。
3、如何在代码中使用多进程/多线程/装饰器
1、多线程使用
多线程使用方式比较简单,以下面例子为例:
from concurrent.futures import ThreadPoolExecutor, as_completed
with ThreadPoolExecutor(max_workers= n) as executor:
    futures = [executor.submit(sum, chunk) for chunk in chunks]  # 提交任务
    results = [future.result() for future in as_completed(futures)]  # 获取结果
当软还有另外一种执行方式:
import threading
thread_1 = threading.Thread(target= sum)
thread_2 = threading.Thread(target= sum)

thread_1.start()
thread_2.start()

thread_1.join()
thread_2.join()
第一种相对而言比较简单(自动管理线程),而第二种需要我去创建多个进程,然后对不同进程之间进行 start() 以及 join(),实际使用如果是一个长期执行任务可以用 threading.Thread(比如说要一致保持摄像头开启就可以直接 threading.Thread(target=video_capture_thread, daemon=True).start() )而并行任务可以选择 ThreadPoolExecutor不用去手动创建
一般来说使用过程中只需要注意如下几个操作:1、向你创建的进程中提交任务(提交的内容是:你要进行计算的函数,函数所需要的参数);2、获取你提交任务所得到的结果(因为是多线程,因此返回得到的结果也就是不同线程的结果)
需要注意的就是下面几个内容:1、submit 提交你的任务;2、as_completed 执行你的任务
不过需要小心的一点是,使用多线程,需要保证 thread-safe(线程安全),比如说同时向一个文件里面写入时候,我通过使用LLM的api执行时候,我有一个较长的文本,先将他拆分(保证是模型的最大允许输入),然后“一次性”(假设的是线程数量恰好和分割数量一致)将其进行api访问(这样时间消耗肯定比普通的要少)将处理结果然后写入到一个文件中就需要考虑进程锁问题,因为所有任务结果都写入同一个问题可能会导致 进程冲突,比如说:
from concurrent.futures import ThreadPoolExecutor, as_completed
import time

def llm_api_result(num):
    time.sleep(2)
    return f"{num}"*100

def write_to_file(num):
    content = f"Thread-{num}: " + llm_api_result(num)
    with open("./output-without-lock.txt", "a", encoding= "utf-8") as f:
        f.write(content)
        f.write("\n")

def main():
    with ThreadPoolExecutor(max_workers=5) as executor:
        futures = [executor.submit(write_to_file, num) for num in range(10)]
        for future in futures:
            future.result()

if __name__ == "__main__":
    start_time = time.time()
    main()
    print("Used Time:", time.time()- start_time)
这样一来得到的结果为:
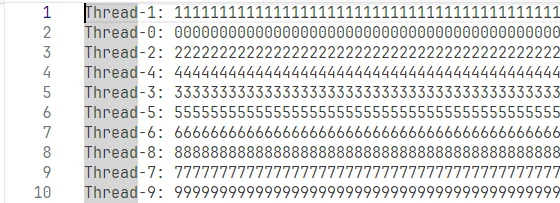
但是上面代码中并没有对进程加锁(lock = threading.Lock()),但是结果还是可以正常(write是一个 原子操作 )写入(有时候会出现遗漏掉内容),但是写入顺序是不对的。
原子操作(atomic operation) 指的是 不可被中断的操作,它要么 完整执行,要么 完全不执行
将代码改为下面代码,通过使用进程锁来保护原子操作:
import threading
lock = threading.Lock()
def write_to_file(num):
    content = f"Thread-{num}: " + llm_api_result(num)
    with lock:
        with open("output-with-lock.txt", "a", encoding="utf-8") as f:
            f.write(content)
            f.write("\n")
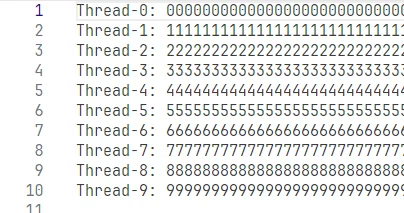
这样一来就可以正常写入结果
2、多进程使用
Python 的 multiprocessing 模块基于 fork 或 spawn 机制,可以创建多个独立进程,让它们并行执行任务,从而绕过GIL(全局解释器锁),提高 CPU 密集型任务的性能(数学运算、数据处理等)。使用起来也比较简单
一个具体例子:
import time
import multiprocessing
from concurrent.futures import ProcessPoolExecutor, ThreadPoolExecutor

# 计算斐波那契数列的函数
def fibonacci(n):
    if n <= 1:
        return n
    else:
        return fibonacci(n - 1) + fibonacci(n - 2)

def single_process():
    start_time = time.time()
    for _ in range(4):
        fibonacci(35)
    end_time = time.time()
    print(f"Single-process time: {end_time - start_time:.2f} seconds")

def multi_thread():
    start_time = time.time()
    with ThreadPoolExecutor(max_workers= 4) as executor:
        futures = [executor.submit(fibonacci, 35) for _ in range(4)]
        result = [future.result() for future in futures]
    end_time = time.time()
    print(f"Multi-thread time: {end_time - start_time:.2f} seconds")

def multi_process1():
    start_time = time.time()
    processes = []
    for _ in range(4):
        process = multiprocessing.Process(target=fibonacci, args=(35,))
        processes.append(process)
        process.start()
    for process in processes:
        process.join()
    end_time = time.time()
    print(f"Multi-process-1 time: {end_time - start_time:.2f} seconds")

def multi_process2():
    start_time = time.time()
    with ProcessPoolExecutor(max_workers= 4) as executor:
        futures = [executor.submit(fibonacci, 35) for _ in range(4)]
        result = [future.result() for future in futures]
    end_time = time.time()
    print(f"Multi-process-2 time: {end_time - start_time:.2f} seconds")

if __name__ == "__main__":
    single_process()
    multi_thread()
    multi_process1()
    multi_process2()

Single-process time: 8.93 seconds
Multi-thread time: 9.89 seconds
Multi-process-1 time: 3.81 seconds
Multi-process-2 time: 3.67 seconds
python里面使用多进程和多线程代码上没有多大区别,只不过使用多进程需要注意的是上面代码使用必须(在window系统上)要用到下面代码,但是linux系统就没有这个问题,这是因为两种启动进程的方式是不同的。
if __name__ == "__main__":
这是因为创建子进程时,会重新导入主模块。如果不将多进程代码放在 if __name__ == "__main__": 块中,可能会导致递归创建子进程,甚至引发程序崩溃。更加底层的原因可以直接参考python官方解释。更加进一步的理解 python多进程
首先在 Python 的多进程编程中,进程之间是相互独立的,它们不能直接共享内存。为了在不同的进程之间传递数据,通常需要将数据序列化为字节流,然后在目标进程中反序列化。pickle(更加详细描述🔗) 就是用来完成这个任务的,言外之意就是说需要通过 pickle 来将不同进程之间进行传递数据。比如说:
import multiprocessing
def square(number):
return number ** 2
if __name__ == "__main__":
numbers = [1, 2, 3, 4, 5, 6, 7, 8, 9, 10]
# 创建一个进程池,使用 4 个子进程
with multiprocessing.Pool(processes=4) as pool:
# 使用 map 方法将 square 函数应用到 numbers 列表中的每个元素
# map 方法会将任务分配给子进程并行执行
results = pool.map(square, numbers)
print("原始列表:", numbers)
print("平方结果:", results)
上面例子中 pickle(multiprocessing 模块会自动使用 pickle 来序列化(一般而言:基本数据类型,列表,元组,字典等容器类型,自定义类的实例,函数(但不包括函数中引用的外部对象,如文件对象、数据库连接等))和反序列化)如下内容:square 函数(传递给子进程)。numbers 列表(传递给子进程)。results 列表(从子进程返回给主进程)。
3、装饰器
装饰器(Decorator)是一种用于修改函数或类行为的高级 Python 语法。它本质上是一个高阶函数,可以在不修改原函数代码的情况下,动态地添加功能。主要作用减少重复代码等,说人话就是将函数作为一种参数输入到函数中。使用方法很简单直接在需要使用的函数上面添加 @装饰器 即可。
比如说,要计算一个函数运行时间一般而言会通过:
import time

def test():
    print("Hello!")

def main():
    start_time = time.time()
    test()
    print(f"Used Time: {time.time()- start_time}")
但是如果定义一个计算时间函数,比如说:
def com_time(func):
    start_time = time.time()
    func()
    print(f"Used Time: {time.time()- start_time}")

def main():
    com_time(test)
这个里面就是将函数 test 作为一个参数进行输入,更加简便的方法就是直接使用装饰器,比如说:
def com_time(func):
    def wrapper(*args, **kwargs):
        start_time = time.time()  # 记录开始时间
        result = func(*args, **kwargs)  # 执行被装饰的函数
        print(f"Used Time: {time.time() - start_time:.4f} 秒")  # 计算并输出执行时间
        return result
    return wrapper

@com_time # 等价于 com_time(test)
def test():
    time.sleep(0.5)
    print("Hello!")

def main():
    test()
值得注意的是,如果直接下面定义:
def com_time(func):
    start_time = time.time()
    func()
    print(f"Used Time: {time.time()- start_time}")
会出现错误,这是因为装饰器中的代码逻辑。具体来说,你在装饰器内部直接调用了 func(),而装饰器的正确用法应该是返回一个包装函数,来替代原函数的执行
Python一些特殊属性
-
- 对象和类的特殊属性(这些属性通常出现在 类 和 对象 中)
| 属性 | 作用 |
|---|---|
__dict__ |
返回对象的属性字典(仅适用于具有 __dict__ 的对象)。 |
__class__ |
获取对象的类。 |
__bases__ |
获取类的所有基类(仅适用于类)。 |
__name__ |
返回类或模块的名称。 |
__module__ |
指示类定义所在的模块。 |
__mro__ |
返回方法解析顺序(Method Resolution Order)。 |
-
- 模块和文件的特殊属性(这些属性通常用于 模块 和 文件 级别)
| 属性 | 作用 |
|---|---|
__file__ |
返回模块的文件路径(仅适用于 Python 脚本)。 |
__name__ |
返回模块的名称,主程序运行时返回 "__main__"。 |
__package__ |
返回模块的包名,若模块不是包的一部分,则为 None。 |
__doc__ |
返回模块、类或函数的文档字符串(Docstring)。 |
__annotations__ |
返回函数的参数和返回值的注解字典。 |
-
- 运行时相关的特殊属性(这些属性与 Python 运行时 有关)
| 属性 | 作用 |
|---|---|
__import__ |
负责导入模块(通常使用 import 语句,而不是直接调用)。 |
__builtins__ |
包含 Python 内置函数和异常的模块。 |
__debug__ |
Python 运行时的 debug 模式,默认值为 True。 |
__loader__ |
加载模块的加载器对象。 |
-
- 方法相关的特殊属性(这些属性主要与 方法 相关)
| 属性 | 作用 |
|---|---|
__call__ |
使对象变为可调用(可重载 __call__ 方法)。 |
__getitem__ |
允许对象使用 obj[key] 访问(可重载 __getitem__)。 |
__setitem__ |
允许对象使用 obj[key] = value 赋值(可重载 __setitem__)。 |
__delitem__ |
允许对象使用 del obj[key] 删除元素(可重载 __delitem__)。 |
__len__ |
允许对象使用 len(obj) 获取长度(可重载 __len__)。 |
__repr__ |
返回对象的官方字符串表示,用于 repr(obj)。 |
__str__ |
返回对象的可读字符串表示,用于 str(obj) 或 print(obj)。 |
class Test():
    def __init__(self, age):
        self.age = age

    def add(self):
        '''加一'''
        return self.age+ 1

test = Test(13)
test.__dict__['name'] = 'https://www.big-yellow-j.top/'
print(test.name)
print(test.add.__name__)
print(test.add.__doc__)

https://www.big-yellow-j.top/
add
加一
一些Python内置的装饰器:
1、@staticmethod:定义静态方法,无须实例化即可调用
2、@classmethod:定义类方法,可以访问类变量
3、@property:将方法转换为属性
比如说:
class Person:
    place= 'bj' # 类变量(所有实例共享)

    def __init__(self, name):
        self.name = name

    @staticmethod
    def age1(age):
        print(f"{age}")

    @classmethod
    def new_place(cls, new):
        cls.place = new

    def age2(self, age):
        print(f"{self.name}:{age} from {self.place}")

    def age3(self, age):
        if age>= 20:
            Person.new_place('sh')
        print(f"{self.name}:{age} from {self.__class__.place}")

Person.age1(13)
Person("Tom").age2(13)
Person("Tom").age3(23)

13
Tom:13 from bj
Tom:23 from sh
但是切换顺序:
Person.age1(13)
Person("Tom").age3(23)
Person("Tom").age2(13)

13
Tom:23 from sh
Tom:13 from sh
这是因为使用age3时候就将类变量进行了修改,还有一些装饰器比如pytoch里面有些要不进行梯度更新,除了使用with torch.no_grad()可以直接用@torch.no_grad()(这个一般就是在类里面加一个这个(比如生成内容,一般就不需要更新梯度))
结论
解释了python里面的 多进程/多线程/装饰器。更加详细准确直接去看 官方文档!!!!链接:https://docs.python.org/zh-cn/3.12
值得注意的是
1、在使用多进程时候,如果遇到无法 pickle 问题如何处理
比如说在使用百度OCR工具(Win电脑上测试)时候,如果设置不当就会遇到:TypeError: cannot pickle 'paddle.base.libpaddle.PaddleInferPredictor' object,比如说你的代码(省略很多内容)如下:
def main_process():
    ...
    ocr = PaddleOCR(
        det_model_dir="./ch_PP-OCRv4_det_infer",
        rec_model_dir="./ch_PP-OCRv4_rec_infer",
        use_angle_cls=True,
        lang="en",
        use_gpu=True
    )
    with ProcessPoolExecutor(max_workers= max_workers) as executor:
        futures = {executor.submit(process_region, ..., ocr)
                   for region_idx, region in enumerate(detection_region)}
        ...
def process_region(..., ocr):
    ...
    ocr_result = ocr.ocr(roi, cls=True)
    ...
一个比较简单处理办法就是在 ProcessPoolExecutor中添加一个 initializer参数保证:它会在每个工作进程启动时被调用。那么代码为:
def init_worker():
    global ocr
    ocr = PaddleOCR(
        det_model_dir="./ch_PP-OCRv4_det_infer",
        rec_model_dir="./ch_PP-OCRv4_rec_infer",
        use_angle_cls=True,
        lang="en",
        log_level='ERROR'
    )
def main_process():
    ...
    with ProcessPoolExecutor(max_workers= max_workers, initializer= init_worker) as executor:
        futures = {executor.submit(process_region, ..., ocr)
                   for region_idx, region in enumerate(detection_region)}
def process_region(..., ocr):
    global ocr
    ...
    ocr_result = ocr.ocr(roi, cls=True)
    ...
这里面还有另外一个注意点:如果所有的子进程都要加载同一个内容,就会发生冲突这个需要避免,比如说在process_region里面使用
  ocr = PaddleOCR(
      det_model_dir="./ch_PP-OCRv4_det_infer",
      rec_model_dir="./ch_PP-OCRv4_rec_infer",
      use_angle_cls=True,
      lang="en",
      use_gpu=True
  )
所有的进程都需要加载同一个文件夹,这里就会出现错误
参考
1、https://docs.python.org/zh-cn/3.13/library/concurrent.futures.html
2、https://docs.python.org/zh-cn/3.13/library/threading.html
3、https://zh.wikipedia.org/zh-cn/%E5%85%A8%E5%B1%80%E8%A7%A3%E9%87%8A%E5%99%A8%E9%94%81
4、https://zh.wikipedia.org/wiki/CPU%E5%AF%86%E9%9B%86%E5%9E%8B
5、https://docs.python.org/zh-cn/3.13/library/multiprocessing.html
6、https://docs.python.org/zh-cn/3.12/library/pickle.html
7、https://docs.python.org/zh-cn/3.12/library/stdtypes.html#definition.name